SharePoint and MAXDOP

Microsoft strongly recommends that the SQL Server MAXDOP (maximum degree of parallelism) setting be set to “1” for servers supporting SharePoint. This setting suppresses parallel plan generation, and until SQL 2016, it’s an instance level setting, which means that all databases on that SQL instance would be affected by the change. Since most databases benefit from parallel plan generation, this setting will result in worse performance for most databases, except SharePoint, where this setting is strongly recommended. Though, when Microsoft says “recommended”, they really mean “required”, as SharePoint will not install or create new databases when the SQL Server does not have a MAXDOP of 1, starting in 2013. This is an easy requirement to miss, for a few reasons. First, this requirement is not mentioned in the documentation. Second, the SharePoint installer will set MAXDOP to 1 automatically if the install account has sysadmin permissions on the SQL Server. Since many shops will follow the advice to have a SQL instance that is dedicated to SharePoint, it’s rarely an issue as the setting applies automatically and no other database is affected as SharePoint is the only application using that SQL Server instance.

However, if you have a company that decided to have one huge database server that runs as many databases as possible, then this is a significant issue. Changing the server so that all databases run without parallel execution plans is a no-go. But installing SharePoint 2013 or 2016 without this option is also a problem. The solution is to follow best practices and set up a new SQL instance to support the SharePoint installation, but it’s not always easy to convince the IT group they need to diverge from their established plan of hosting as many databases as possible on one server and to spin up a new SQL instance in order to support SharePoint.

Creating an Azure Function to act as a SharePoint Timer Job

High level steps:

1. Create a new Azure Function in the Azure Portal
2. Upload the SharePoint Client dlls
3. Configure AppSettings for the username, password, and other fields as desired
4. Write and execute PowerShell!

Create a new Azure Function in the Azure Portal

This is documented lots of places, including a hello world example in the docs, but here’s a summary of the steps:

1. Log into the azure portal
2. Click the green plus sign to add a new service, and search for “function”.
3. Click “function app” in the search results, and then click create in the next dialog
4. Fill in the standard azure options dialog, specifying subscription, resource group, etc.
5. Wait for it to be created, and then navigate to your new function app.
6. On the “Get started quickly with a premade function” page, don’t click any of the large boxes. Instead, click “create your own custom function”.
7. That should take you to a page with a scrollable list of a bunch of different options. In the Language filter at the top, pick “PowerShell”.
8. Select TimerTrigger-Powershell
9. Give it a name and a schedule. (careful, the default schedule is to run it every 5 minutes! As noted below, MS provides documentation of examples of different entries for this field to run the function at different times.)

Ok, at this point you should have an Azure Function that uses PowerShell and is configured to run every 5 minutes (or on whatever schedule you specified). You can also manually run it via the “Run” button, and you should see the output in the console at the bottom of the screen.

A few details before going on to the next step:
1. To change the schedule, click on “Integrate”
2. To see example of different scheduling options, on the “Integrate” page, click on “documentation”
3. To pause it so it’s not running every x minutes, click on “Manage”, and then “disable” at the top
4. To see how many times it has run, click on “Monitor”.
5. To get to a huge list of other options that are typical for Azure, click on the name of your function app, (on the left side, above your function, above “Functions”), and then click “Platform Features”

Upload the SharePoint Client dlls

At this point, you can write whatever PowerShell you want, but if you want to use the SharePoint Client dlls, you’ll need to upload them. Though, the first step is finding them. They should be in:

C:\Program Files\Common Files\microsoft shared\Web Server Extensions\16\ISAPI

Of course, you can also download them from here:
https://www.microsoft.com/en-us/download/details.aspx?id=51679

Specifically, you’ll need to find the following two dlls:
Microsoft.SharePoint.Client.dll
Microsoft.SharePoint.Client.Runtime.dll

There’s a couple ways to get the dll files uploaded. You could use FTP or Kudu. A nice walkthrough of using FTP is here. A walkthrough using Kudu is here. Following is the quick explanation for Kudu, which seems easier to me:

1. Click on the name of your function app, (on the left side, above your function, above “Functions”), and then click “Platform Features”
2. Under Development Tools, click “Kudu”
3. In the top nav, select debug console –> PowerShell
4. In the top panel, click on “site” –> “wwwroot” –> nameofyourfunction
5. either use the PowerShell window to create a new directory named “modules”, or click the big plus sign towards the top of the screen and select “new folder”, and name it “modules”
6. click the modules folder. At this point, just drag and drop files from windows explorer onto the table with the “name”, “modified”,”size” headers. Specifically, drop both files, mentioned above.

Actually, another way to upload files is just to use the “View Files” tab in the panel on the right in the screen where you can work on your function. However, at this time, I don’t know of a way to create a folder from that panel, and we need the dlls to be in the “modules” folder.

Also, if you like the PnP project, all of these instructions work for those PowerShell commands as well. Just find the install folder for PnP, which is something like:
C:\Program Files\WindowsPowerShell\Modules\SharePointPnPPowerShellOnline

It should have a couple dozen dlls, including OfficeDevPnP.Core.dll. Just upload all the dlls in that directory, and the PnP PowerShell cmdlets should work just fine.

Configure AppSettings for the username and password

There’s a nice writeup of this here, but here’s a short list of the basic steps:

1. Get back to the Platform Features page
2. Under General Settings, click “Application Settings”
3. In the panel on the right that appears, scroll down to the “App settings” section.
4. Add keys and values as needed, then don’t forget to click “save” at the top. For my code example below, I’ve created two settings, “O365User” and “pwd”

Write and execute PowerShell!

Ok, all the prereqs should be in place. Next is the actual function code. So, get back to the function where there was one line of sample code with one line that writes out the date. Leave that line there, and paste in the following, modifying the URL to point to your SharePoint online site. This code is pretty much the basic hello world example from Microsoft’s getting started page for CSOM.

Write-Output "PowerShell Timer trigger function executed at:$(get-date)";
$userId = $env:O365User
$pwd = ConvertTo-SecureString $env:pwd -AsPlainText -Force
$url = "https://somehost.sharepoint.com/sites/somesite"

$clientContext = New-Object Microsoft.SharePoint.Client.ClientContext($url)
$clientContext.Credentials = New-Object Microsoft.SharePoint.Client.SharePointOnlineCredentials($userId, $pwd)

if (!$clientContext.ServerObjectIsNull.Value)
{
Write-Output "Connected to SharePoint Online site: '$Url'"
}

# The SharePoint web at the URL.
$web = $clientContext.Web;

# We want to retrieve the web's properties.
$clientContext.Load($web);

# Execute the query to the server.
$clientContext.ExecuteQuery();

# Now, the web's properties are available and we could display
# web properties, such as title.
Write-Output $web.Title;

Lastly, don’t forget that is is running on a timer, and so you’re paying for it at this point. So disable it or delete it to stop the charges.
Excel Services has been Deprecated

SharePoint 2013 (and previous versions) shipped with Excel Services, allowing Excel workbooks to be viewed in the browser. SharePoint 2013 integrated with Office Web Apps (OWA), which also had the capability to show Excel workbooks in the browser. The complication in 2013 was that the two services had somewhat different functionality, resulting in some organizations having to use Excel Services to gain access to specific BI functionality. In SharePoint 2016, Excel on Office Online Server (OOS), formerly known as Office Web Apps (OWA), has been enhanced and now has the capability to work with Excel workbooks that utilize BI capabilities, such as data models.

Microsoft is now recommending that organizations move away from Excel Services and to use OOS instead. This has a couple impacts on clients:

  1. Smaller implementations, such as organizations using SharePoint as a platform for Project Server and that support a limited number of users, will now need a second server. Excel services was a service that ran on SharePoint, but OOS is a separate server product that cannot be installed on the same server as SharePoint.
  2. The list of requirements to support BI is still quite complicated, and will be challenging to communicate to clients. (perhaps a good infographic would help). For example, Excel files with Power View will require SSRS in SharePoint integrated mode to be viewable in the browser. Also, refreshing connections in Excel files with data models will require the PowerPivot add-in.

Microsoft Blog Post about this is here
(see the word doc that is linked in the first paragraph for details on deploying PowerPivot and Power View in 2016)

A good document that compares Excel Services and the Excel Web App from 2013 is here

BI Options

The options for displaying data are vast and confusing. Following is a short(!) summary of some of the available options:

SSRS

  • SSRS is great for displaying static reports, such as when users want the report to look a certain way each and every time the report is viewed
  • SSRS reports can be viewed in the browser or can be saved as PDF or Excel files and emailed to users
  • Since SSRS reports can be viewed in a browser, users can view them with no training other than telling them what link to click on
  • SSRS reports can be set to run the underlying queries on a set schedule so that slow queries can be run overnight
  • SSRS works by sending queries to database, allowing it to send a query to a large database and receive only the records that meet some criteria. This allows SSRS to present live data with no wait times for users, even when the underlying datasets are large.
  • SSRS can work in two modes:
    • SharePoint Integrated
      • Reports are stored in SharePoint libraries.
      • Permissions for reports are in-part handled by SharePoint.
    • Native Mode
      • In Native mode, SSRS provides a site where users can view reports
      • Permissions for reports are configured within the SSRS site
      • Native mode supports the following for authentication: Negotiate, Kerberos, NTLM, Basic
    • Reports can be surfaced in custom ASP.Net applications

Excel

  • Excel can use data from databases as the source of pivot tables and charts
  • Users who know how to use pivot tables can add/remove fields and otherwise rearrange the pivot table to meet their needs
  • Pivot Tables support “slicers”, which allow users to easily filter reports
  • Excel works by importing potentially large numbers of rows, and allowing users to filter/aggregate, etc. This is a nice capability for analysts, but this means that the data isn’t “live”. To get live data, the excel user must “refresh” the dataset, which can take a varying amount of time, depending on the amount of data.
  • Excel “reports” can be uploaded to a SharePoint library, and can be displayed on a SharePoint page via a web part
    • Excel “reports” that are uploaded to a SharePoint library can be refreshed with current data, but that feature requires the installation of additional components on SharePoint.
  • Quite of bit of Excel Documentation will mention “Power View”. However, Power View is based on Silverlight and is being phased out.

Power BI

  • The phrase “Power BI” has meant a few different things of the last couple years:
    • The set of BI tools that are available for Excel, including PowerPivot, Power Query, Power Maps, and Power View
    • A feature within Office 365 that allowed PowerBI Excel workbooks to be displayed and datasets within to be refreshed. This particular capability has been phased out, and has been replaced by PowerBI.com
    • A cloud-based web site (PowerBI.com) that allows users to create dashboards using data from cloud services as well as on-prem databases
  • PowerBI.com
    • As mentioned above, this supports building dashboards based on data from cloud sources or on-prem databases. There are a couple main ways of supporting this scecario:
      • Manual: a user creates an excel file with data from an on-prem source, uploads the file to powerbi.com, and then creates dashboards based on the data. Because there is no connection between PowerBi.com and the on-prem data source, the free version of PowerBI.com may be used.
      • Automated: A user installs and configures a “gateway”, and then builds a dashboard using data from the on-prem database. Once published to PowerBI.com, the gateway allows PowerBI.com to refresh the dataset on a configured schedule.


Office 365 Groups vs Teams vs Planner

Teams were clearly introduced to compete with Slack. Though, why did slack become popular? So perhaps check out this to see what MS was trying to copy.

Some teams will certainly like Teams, while other teams will prefer the more traditional route of Groups or Yammer. Though, creating a Team will create a Group, so teams really aren’t choosing between a Team and a Group, but rather it’s choosing to use either a Group or a Group plus a Team. Likewise, creating a Site will now create a Group. In the past, a Group had a Site, but again, now all new Sites will have Groups (to be precise, new Site Collections). So, create a Site, which also gives you a Group. Then, optionally, create a Team based on the Group, which is, of course, connected to the Site. Again, see the above article for the advantages of Teams, but it really comes down to preference. Some teams prefer to use email for team conversations, and so those teams should use Groups. Other teams prefer for all intra-team communication to be hosted in an app and to avoid email, and so those teams should use Teams.

Planner is available for teams who need task management. Of course, tasks could be assigned via email, but many teams prefer having better tracking capabilities and such, and so those teams should use Planner. Plans are associated with Groups, so organizations that want to use Planner will need to be using Groups. As mentioned above, when a Team is created, a Group is also created, so Teams can use planner due to the fact that their Team is already connected to a Group.

Yammer is the odd one out. It’s not replaced by Teams or Groups, as Teams can have a max of 600 members on a Team, and Microsoft suggests keeping Groups to below 1000 members for performance reasons. Yammer is not replaced by a single Group, as Yammer supports multiple, threaded conversations across multiple groups. Perhaps Yammer is a preference vs O365 Groups in smaller organizations? Except, that they just announced that Yammer will be able to integrate with Groups, giving Yammer the ability to utilize Group resources, such as the Group document library, OneNote, and Planner. So perhaps Yammer is positioned as the Enterprise Social Network, while Groups are better suited for small/medium company or departmental level efforts? Again, personal preference may come in here as well.

How Files are Organized within Microsoft Teams/O365 Groups

If a user wants to store a file for an Office 365 Group, the could store it in in the “files” area of the Group, which is really just a library in the team site that was created for the group. Alternatively, they could store the file in the “files” area of a channel within a Team. This file will be stored in a subdirectory of the library for the Office 365 Group. If a user tries to view the files for a team that is associated with a group, they won’t be able to, as files are only associated with a channel, not the team itself. If a user views the files for a specific channel of a team that is associated with a group, they will only see files for that one channel, and will not be able to view files in other channels or files that were uploaded to the files repository for the Group. If, however, the user navigates to the normal O365 Group site and views the file repository, then they will be able to view group files, plus they will be able to see subfolders and files that were created for each channel within the Team that is associated with that Group, which makes sense, as the channels are associated with the group.

If a user would like to view a file, they could of course navigate to the appropriate repository, as described above, or they could simply click on “files” on the left nav of the Teams interface. Then, after clicking on “Microsoft Teams”, the user will be presented with a list of all files that exist across all all channels of all Teams they have access to. Helpfully, this list will also show files that are part of the Group, and not just the team’s channels. Just to clarify, if the user clicks on “OneDrive” in the Files tab, they will see the contents of their own personal OneDrive, not the OneDrive files for any of the teams or groups.

If the user clicks on “notes” within a channel of a Team, they will gain access to the OneNote notebook for that channel. More specifically, there is one single OneNote notebook for the Office 365 Group that is stored in the site assets library of the Group’s Team Site which hosts notes for the Group, including notes for each channel within the Team. Each channel of a Team will get a new tab within the notebook. If a user views the Notes section within the Team interface, they will see only the notes for the current channel. If the user clicks the “edit in onenote” button, they will be able to easily switch between tabs within onenote, and thereby view the notes from the different channels, or notes from any other tab that was created in the site notebook. If the user navigates to the Group site and clicks to view the notebook, the user will have full access to all tabs in the web interface, including the tabs for each team channel. This makes sense, as again, there’s one OneNote Notebook on a Group’s Team Site that stores notes for Group, including for all channels of the Team that is associated with that Group.

It really couldn’t be simpler. 😉

Flow is out of Beta

Flow is a new, cloud based tool that enables users to create workflows. The “old” way to create workflow is via SharePoint Designer connected to a SharePoint site. MS will not create new versions of SharePoint Designer, nor will they enhance the functionality of SharePoint Designer workflows. Currently, while SharePoint Designer workflows can connect to either SharePoint on-prem or Office 365 sites, they cannot connect to other services without involving a developer skillset. A SharePoint Designer workflow is therefore mostly limited to working within the context of SharePoint lists and libraries.

Flow, on the other hand, can connect to a variety of services, including:

  • Office 365
  • SharePoint on-prem
  • Dynamics
  • OneDrive
  • SQL Server (on-prem and cloud)
  • Azure
  • DropBox
  • GitHub
  • Facebook
  • Google Drive
  • InstaGram
  • Wunderlist
  • MailChimp

Note, the above list aren’t simply things that flow can connect to as part of SharePoint process, but Flow can use those services completely separately from SharePoint. So Flows can be created that are triggered based on events in any of the above services, and then take actions in any of the other services. So, for example, an email or notification can be sent for each new item in CRM, or each new sign up for mailchimp could be added to a SQL table, etc.

See the full list of available services, here:

https://flow.microsoft.com/en-us/services/

(click on any of the above services to see sample Flows of what could be done with it).

Pricing details are here:

https://flow.microsoft.com/en-us/pricing/

(Scroll down on the above page to see what’s included for Office 365 subscribers).

New Archive Button in Outlook

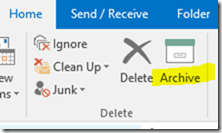
A new “Archive” button has been added to the ribbon in Outlook:

clip_image001

Note, this Archive button has absolutely nothing to do with Outlook’s archive functionality. This new button is simply doing a move of whatever items are selected. So, if you’re in the habit of dragging messages into a folder when you don’t want to see them in the main folder any longer, you can use this button instead to accomplish the same thing.

Outlook Online also has an archive button, which does the same thing as the Outlook Client:

clip_image002


Where do “archived” messages go?

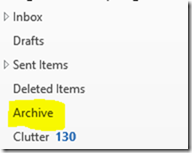
By default, they’ll land in a folder named “Archive” which shows up as a top level folder:

clip_image003


How to change which folder is used?

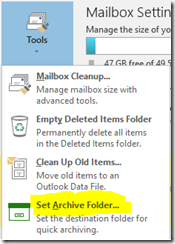
In the Outlook Client, go to File –> Tools –> Set Archive Folder…

clip_image004

Changing the folder will take effect immediately in the Outlook Client, and will sync to Outlook online and take effect there in about 15 minutes.


Keyboard Shortcuts

One more difference between Outlook Client and Outlook Online: keyboard shortcuts. In the client you can archive items via backspace, in Outlook online it’s “e”.

The Office 365 Connectors Concept and Purpose

Office 365 Connectors is a new feature for Office 365 Groups that allow content from a variety of services to be surfaced in the Group feed. For example, imagine an IT consulting company that has IT and Sales staff that need to keep up with the changes to the Office 365 service. Each day, different members of the team check the MS Office Team Blog as well as news sites and they email each other links and interesting content. Also, the sales team will periodically update customer info in Salesforce, including customers who use Office 365, and they email the IT team relevant info about these customers.

To make this process easier, the team could create an Office 365 Group and use that in place of email. As documented elsewhere, this provides a number of benefits, including a OneNote notebook, a document repository, and others. However, with the Group, the team members still need to be checking other sources of info, as well as the fact that the sales team needs to remember to post content to the Group for things that they updated in Salesforce.

This is where the new “Connections” feature comes in. It allows users to add a “connection” to Salesforce, so certain updates will trigger an alert that gets sent to the Office 365 Group. (Of course, connections can be made to dozens of different services, not just Salesforce).

Also, a connection can be configured for the Office Team Blog (via the RSS feed connector), so any new content that is posted there will appear in the Office 365 Group.

As another example, a Bing News Feed could be added so that a daily summary of news articles that mention Office 365 could be added to the Group.

Again, it’s easy enough for users to go check the blog and other sources, but this puts all of this content in one place.

This “connector” feature also highlights the difference between a Team Site and an Office 365 Group. In a Team Site, we would have added web parts to the home page to surface this sort of content. With Groups, there is no customizable home page, and the main center of activity is the inbox. So connectors are, in a way, bringing us functionality that we’ve had in the past, though connectors also add the idea of surfacing content on a schedule or based on events, and bringing that info to people’s inboxes, rather than requiring the users to go look at a page to find out if something has changed.

On the other hand:

Who, exactly, has ever wished that all of their coworkers could have the ability to sign them up for more mass emails?

Because that’s what Connectors bring to the table.

Connectors are about surfacing relevant info from a variety of sources in one place.

And that place is your inbox.

So again, you might be part of a group that’s involved in something you have to do a few times a month, and the Office 365 Group allows the team to have conversations and such, which is great. And then one team member decides to set up a connection to a couple services, and now you’re getting several additional emails a day.

Connectors don’t allow you to specify that particular users should get the alerts, and you can’t opt out. Again, the “old” model was to have all this information from these different places aggregated on the home page of a SharePoint site, so it was there whenever you wanted to go see it. The new model is to funnel all of this content through your inbox.


Getting Access to Planner in Office 365

Microsoft has made “Planner” available to First Release customers. However, it doesn’t automatically just show up in your tenant. You have to go through a short procedure to actually register for it.

Instructions for doing so and the link to register are available here (If you’re already in first release, then see step 2):

https://support.office.com/en-us/article/Add-Office-365-Planner-Preview-to-your-account-1843f004-8309-4ecd-9b35-17b77998b420?ui=en-US&rs=en-US&ad=US