Author Archives: Mike G

The Future of Power View and Comparing Data Refresh Options in Power BI

Oh Power View, we hardly knew you.

From Microsoft support:

“The Power View button in the Reports group has been removed from the ribbon in Excel 2016 for Windows. The interactive visual experience provided by Power View is now available as part of Power BI Desktop.”

This support article goes on to say that Power View can still be turned on in Excel 2016 and is still supported. But this means that creating new projects based on Power View is now questionable. Though, the article is correct: the functionality of Power View is indeed available in Power BI. It’s essentially the same tool from a usage perspective, so if a user knows how to build dashboards in Power View, they’ll be up and running with Power Bi in minutes. Though, while building dashboards is the same, figuring out how data is refreshed and ramping up on licensing is a bit more challenging. So, following are different usage scenarios for refreshing data, starting with Power View in an Excel workbook that’s not hosted in SharePoint, and progresses though different options up to Power BI. Note, in all cases the basic scenario is the same: a dashboard that gets its data from an on-prem SQL Server database.

  • If Excel with a Power View sheet is used without SharePoint, then an employee could open the Excel workbook which could be stored anywhere or even emailed to users. The workbook could be configured to automatically refresh the data from the database as the user opened the workbook.
  • If Excel with a Power View sheet is used with either SharePoint on-prem or Office 365, users would be able to view the dashboard in their browser. However, the dashboard would contain the data as it existed the last time the workbook was refreshed. To refresh the workbook, a user would have to open the Excel file in Excel, refresh the data connections, and save the file.
    • If everything is set up correctly and if the moon is full, users could refresh the workbook in their browser. However, the refreshed data is not saved back to the workbook. So if Sal refreshes the workbook in the browser, he’ll see the refreshed data but when Sue views the same dashboards several minutes later, it won’t have the refreshed data, and will only display the data as it existed the last time the workbook was saved.
    • As an alternative to having a user opening the file and refreshing, a PowerShell script could be used.
  • If SharePoint on-prem has PowerPivot for SharePoint installed, then the data connections could be set to refresh on a schedule. Note that PowerPivot for SharePoint has additional licensing and hardware requirements. If it is not already installed, installing it is not a trivial process.
    • This leaves out a few technical details. For example, automatic refreshing of data sources isn’t supported for Excel workbooks that have Power View worksheets in them. But a Power View could be created in SharePoint outside of the Excel file.
  • If the free version of Power BI is used, users would be able to view the dashboard in their browser. However, the dashboard would contain the data as it existed the last time the workbook was refreshed. To refresh the workbook, a licensed user would have to navigate to the Power BI site and click a link to refresh the data connection. To view the dashboard, users would only need to sign in to Office 365, and click a link to navigate to the dashboard. (The documentation is confusing on this point, but this is the behavior I’ve seen. To be clear, when I tested it, one user who had a Pro license was able to refresh the dataset, while other users who only had the free version of Power BI were able to view it).
  • If everyone who is going to view the dashboard has a PowerBI Pro license, then the dashboard can be set to refresh automatically on a schedule. Users would only need to sign in to Office 365, and click a link to view the dashboards in Power BI. This is the nicest options for users. However, if users are not already licensed for PowerBI, getting licenses for all users is not a trivial cost.
  • Or, as an alternative, use one of the several available methods for getting data into Azure SQL. Power BI can refresh data from Azure SQL once per day without a Pro license. This does mean having to pay for an Azure SQL instance, but that could wind up being quite a bit cheaper than paying for the Power BI Pro licenses.

Operation Timed Out on the Resource Availability Report in Project 2010

One user was getting an error while trying to view the Resource Availability report in Project 2010, though the report worked fine for all other users. It turns out that the error message in the log file was one of the generic messages that didn’t mean too much: “operation timed out”. So, it wasn’t reporting any sort of permission issues, it was just reporting that the database wasn’t able to finish the queries in the default time of three minutes. So, one option is to go change the config file on the server and allow it to run for more than three minutes. But before doing that, there’s another possibility. On the Resource Availability report page, there’s a section that allows you to change the date range and the units from weeks to days or months:

resource report options


When a change is made to the above, the server remembers that change and defaults it to that for the next time. So, if a user changes the dropdown to “days”, the next time they navigate to this page, “days” will already be selected. However, if the system can’t handle reporting on days within the allotted three minutes, then the error occurs. And, when the user navigates back to that page, it will default to days again, generating the error again, without giving any opportunity to change the selection back to weeks or months.

In light of the above, try the following:

  1. Navigate to the resource center
  2. Make sure that no users are selected
  3. Select one resource that does not have any tasks in the next couple months. Perhaps an old resource that shouldn’t be in the system?
  4. Click on “Resource availability”

If my guess above is correct, then the report will run fine, as there is no data for the user, and as such the timeout won’t be hit. If the report runs, then check the units drop-down. If it says “days”, change it back to weeks. Also, check the date range. If the range is large, make it smaller.

If the above doesn’t work, then the next step will be either troubleshooting the SQL server, or working with IT to get the config file modified to change the default timeout value to a higher number.

Disable Skype for Business for O365 Users with PowerShell

There’s an excellent write-up for this here:

https://community.office365.com/en-us/w/manage/2603

Follow the above, it works. Following are just a few clarifications on a few of the steps for the “Disable Skype for Business” section.

  • In step 1, it has a command where you need to supply the “AccountSkuId”. Note that it explains how to get this in the previous section:
    • Get-MsolAccountSku | Format-Table AccountSkuId, SkuPartNumber
    • This command lists the AccountSkuId in the left-hand column of the output of this cmdlet. My output in my developer tenant has two values:
      • contoso:DEVELOPERPACK
      • contoso:POWER_BI_STANDARD
    • This matches what is seen in the browser when looking at license info for a given user:

o365 licenses

  • The last part of the command is “-DisabledPlans MCOSTANDARD”. Again, look above to get the instructions on how to determine the value for this argument. This command indeed disables Skype for Business (MCOSTANDARD), but you can disable the other services as well. Just look at step two in the previous section. Though, the list of services it provides that can be disabled has changed since this article was published, and is likely to change again. So don’t rely on the list, and instead run the “Get-MsolAccountSku” command that is listed below that list. When I run it on my developer tenant, I get:
    • SWAY
    • INTUNE_365
    • OFFICESUBSCRIPTION
    • MCOSTANDARD
    • EXCHANGE_S_ENTERPRISE
    • SHAREPOINTWAC_DEVELOPER
    • SHAREPOINT_S_DEVELOPER
  • In the browser, when I click the arrow next to “Microsoft Office 365 Developer”, the following is displayed:

o365 licenses_expanded

  • Again, this matches with the PowerShell output, though the names are a bit different. To confirm the license names that appear in PowerShell? Good question. I didn’t find a reference with all possibilities listed. Though, if you do a view source in the browser on the above page, and check the source for the individual checkboxes, the license names are the values of the inputs:

o365 licenses_source

  • One more note, the command to disable licenses works, but how to re-enable them? Well, the –DisabledPlans argument is optional, run the commands again without that argument:

$LicenseOption = New-MsolLicenseOptions -AccountSkuId contoso:DEVELOPERPACK
Get-MsolUser | Set-MsolUserLicense –LicenseOptions $LicenseOption

Conditional Formatting in MS Project 2010 via VBA

This is a bit tricky, as Project doesn’t give the normal hooks for getting access to cell properties, like Excel. Also, the event model for Project is accessed a bit differently.  So, a couple possibilities:

Marked Fields

VBA can set a row as marked, and the style of marked rows can be set via Gantt Chart Tools –> Text Styles –> Item to Change –> Marked Tasks

Once the formatting has been set, it’s simple enough to change a row to marked:


Dim t As Task
For Each t In ActiveProject.Tasks
If t.Cost > 10 Then
t.Marked = True
Else
t.Marked = False
End If
Next

Formatting Individual Cells

However, this colors the entire row, not an individual cell. To shade individual cells, there’s a function named “Font32Ex”. The difficulty with this function is that it works with the selected cell, and doesn’t take a cell reference. To select a cell, we can use “SelectTaskField”:

SelectTaskField Row:=100, Column:=”Cost”, RowRelative:=False

RowRelative is key here, in that the above will select the 100th row, regardless of where the focus was. So, we can put the above in a loop:


Dim i As Integer
For i = 1 To pj.Tasks.Count
Dim t As Task
Set t = pj.Tasks(i)
If t.Cost > 5 Then
SelectTaskField Row:=i, Column:="Cost", RowRelative:=False
Font32Ex CellColor:=62207
Else
SelectTaskField Row:=i, Column:="Cost", RowRelative:=False
Font32Ex CellColor:=-16777216
End If
Next

Note: the color values were obtained just by recording a macro and changing the color in the macro.

The above meets my needs, but perhaps the cell needs to be changed on edit, and not loop through all tasks. If so, check out the technet article that goes over hooking into task level events:

https://msdn.microsoft.com/en-us/library/ee355232%28v=office.12%29.aspx#odc_pj2007_bk_VBAProgrammingProject_UsingTaskEvents

New-AzureSBNamespace for Remote Event Handler Debugging

There are a number of blog posts with outdated instructions for setting up the Azure Service Bus to enable debugging for Remote Event Handlers. The old info is to go to the Azure Portal and create a Service Bus in the UI, or to run the following PowerShell command:

New-AzureSBNamespace -Name mynamespace -Location “East US” -CreateACSNamespace $true -NamespaceType Messaging

However, the UI does not generate a service bus with an ACS namespace (which is required for this task), and the above PowerShell command is deprecated and is not available.

As of the time of writing this, the following works fine:

New-AzureSBNamespace -Name ‘mynamespace’ -Location ‘East US’

The New Delve Blog

My Office 365 tenant just got a new profile update in Delve that has the new blog. It’s, uh, neat? It’s sort of a blog, with a nice but limited editor, and definitely some version 1 functionality. Or version .9.

The editor is similar to what’s used for Sway. So on one hand, everything looks quite good with minimal effort. On the other hand, you don’t get much control. Here’s the toolbar that appears when you select text:

delve blog toolbar

From left to right:

  • Bold
  • Italic
  • Underline
  • Link – currently uses a JavaScript “prompt” function, which is a bit primitive.
  • bullet list
  • number list
  • Convert text to a heading – this does more than apply a format, it inserts a new heading section right above the current section and moves the text to it. There’s no button to click to undo this. Users can manually move the text back, or ctrl-z sort of works. (ctrl-z puts the text back in the original location but leaves the new header, the user will just have to manually delete it)
  • Quote – This moves the selected text to a section right below the current section and applies formatting to it
  • Remove formatting – Removes any of the previously mentioned formatting from the selected text

A few additional notes:

  • If you copy and paste text in from other sources, it will lose its formatting. (this includes things like bulleted lists: paste in a bulleted list and it becomes normal text with line breaks.)
  • You can add a video, but oddly it doesn’t prompt you to select one from an Office 365 video site or OneDrive. It just displays another JavaScript prompt dialog:
javascript prompt

This is sad

  • There are no options to change formatting other than what was already mentioned. So  no changing fonts, and no changing the ~450 pixel high image / header at the top of each and every blog post.
  • There is no standard blog view: you can’t scroll down through recent blog posts. Instead, the blog home page displays a set of Tiles, with the more recent blog post at the top.  Though, once you’re viewing a post, there are some nice looking arrows that appear that let you navigate to the next or previous blog post
  • There is no calendar view of posts to easily see what was posted 3 months ago, for example.
  • It does show you the count of views, which is nice.
  • Like Sway, it automatically adjusts for different sized screens.
  • You can insert documents from OneDrive. They appear on-screen courtesy of Office Online.
  • There is no RSS feed. In fact, there’s no OOB mechanism to find out when someone else has posted something new to their blog. It’s no longer just in a SharePoint library like the old blog, so alerts are not available. The quick solution (?) to this is to set up a search part on a page somewhere and use the following query to return all blog posts. Just sort it by date modified:

path:”https://tenantname.sharepoint.com/portals/personal” ContentTypeId:0x010100DA3A7E6E3DB34DFF8FDEDE1F4EBAF95D*

Or, to display one person’s blog, just put in the more specific path.

Of course, this is a work in progress, so by the time you read this something will have changed.

Prevent users from sharing content with “Everyone” in SharePoint Online

New capabilities were recently added to the SharePoint Online Management Shell that allow us to block users from being able to share content with either “Everyone” or “Everyone except external users”.

To do this, fire up the SharePoint Online Management Shell, and connect as usual:

Connect-SPOService -url https://somesite-Admin.sharepoint.com

To view the current settings:

Get-SPOTenant

get-spotenant

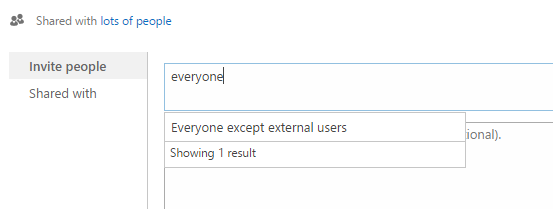
The current sharing dialog before changing any settings:

everyone-before

To hide “Everyone”:

Set-SPOTenant -ShowEveryoneClaim $false

everyone-after

The “Everyone except external users” can be hidden easily as well:

Set-SPOTenant -ShowEveryoneExceptExternalUsersClaim $false

Of course, to turn it back on just run the same command with $true. Note, nothing further has to be done to get these commands to take effect. The next time a user clicks “share”, these items will be hidden.

Connect-SPOService: DTD is prohibited in this XML document

The error message of “DTD is prohibited in this XML document” is an error that can be caused by DNS configuration, as described here. Another simpler cause is trying to connect to the incorrect url, as the Connect-SPOService needs to be provided with the url to the Admin site. So, the following will generate the above error:

Connect-SPOService -url https://somesite.sharepoint.com

The following should work just fine:

Connect-SPOService -url https://somesite-admin.sharepoint.com

Sorting with the SharePoint Search REST API is Case Sensitive

A customer wanted to see a list of users sorted by last name, which seemed pretty simple. The data is already in the search index, and a simple REST call should be all that’s needed, I assumed.

The REST call:

http://server/_api/search/query?querytext='lastname:d*'&sourceid='B09A7990-05EA-4AF9-81EF-EDFAB16C4E31'&sortlist='lastname:ascending'&rowlimit=200&selectproperties='accountname,lastname,firstname'&trimduplicates=false

The above should return all users (since I’m using the predefined source id that points to the user profile search result) whose last names begin with “d”, and the results should be sorted by lastname, ascending. However, this yielded results like:

  • Davidson
  • DeSoto
  • Dean

So, the search REST API is sorting like JavaScript, which is based on the unicode values and not a “normal” dictionary sort. The solution? I don’t know. To my knowledge, there are no options in the Search REST API to control how the sort is executed. The only solution I found was to do the sort via JavaScript.

As an aside, there is an additional problem with the REST call, above. Specifically, “lastname:d*” seems pretty simple and self-explanatory. However, SharePoint doesn’t interpret this as looking for last names that begin with “d”, it apparently interprets this looking for last names that have a word that begins with “d”. So this REST query will return the following:

  • Davidson
  • DeSoto
  • Dean
  • Smith-Davis

There may be a way to specify to only match the beginning of the field value, not the beginning of any word in the field value, but I haven’t found it yet. Again, JavaScript solved this one, though admittedly that’s a poor solution.